Here is a super quick thought about dramatic imagery as well as dramatic black and white portraiture. As photographers, we were all trained to have enough light which allows us to expose our image “accurately”. What we are NOT commonly taught, is to think outside the box. We look around on how to hug the window, how to step into open shade, just enough light to illuminate our subjects. But WHY? Well, because that is what is talked about. That’s what we are TOLD to do. I wanted to write about this to let all of you out there know, it’s OK to not have a photo with lots of pretty bright skin. It’s OK to have a photo with some grain. These things make photos turn into art. These are the photos we all see on Facebook or blogs or other sites and say, “wow, that’s beautiful”. We just don’t know WHY. Or we feel like it’s too hard to scary to break the rules. Well, no more! Time to break them and get creative. Lets jump into why directional light is OH so super cool.
Dramatic light inflicts in the viewer a stronger mood. There are harsher shadows. Edges. You don’t need a big broad light source like you would for a well illuminated portrait. A smaller directional light source is a better option for this type of photo. Hence the term, directional lighting. Don’t be scared about telling a story. Seek shadows. Seek dust particles creeping in the air from the sun coming in through the window. Watch as you move and go in at out of the shadows. Pretty soon you will be more aware of the light and allow your brain to see things in a more creative nature.
Some general tips. Drop your ISO. You don’t want your camera to brighten those shadows. Your camera needs to think it’s bright outside. Spot meter. You do not want your camera evaluating the entire area. You want to trick your camera into thinking the ONE spot of the photo you meter off of, is the one spot you want to be exposed for correctly. After you meter, don’t be scared to totally ignore it. Take a peek at your test image, if its not dramatic enough for you, lower your exposure (lower ISO, faster SS or higher Fstop).
A little disclaimer. Many people will teach you how to find the light by moving your subject. Of course that’s one way to do it, and I will do that as well, and frequently. This post is more about recognizing when super cool light is occurring, and to not run from it. Most of you reading this are beginner photographers and are just trying to really master your camera. So I want to make this super functional. However, that being said, I will not being giving you my camera readings and settings. NO NEED! Every situation is different. All light is diff. Just know all of these my ISO was low enough to keep the face illuminated, my shutter speed was fast enough to not get too blurry and my fstop was adjusted accordingly. For these dramatic shots, my Fstop, or aperture, is adjusted last. Crazy huh? For ME for SURE crazy! I ALWAYS shoot wide open! These are more about keeping dark shadows and exposing just enough to have a super awesome dramatic photo. Tell a story guys! Lesson of the day 🙂
Lets get ready to spot meter! HA! Yeah…I’m a camera nerd.
Areas to keep your eye out for cool light:
1. Your family room.
Notice when your kiddo is away from the window. Turn off all the lights. Keep him in an area that is dark but has a small amount of light in there. Here my son was “resting”…eh hem, sleeping, but he would tell you resting. I noticed it was super dark in the room but his face had an oh so small amount of light illuminating his face. Not alot, but enough to make me see him. I could see his face, and his dinosaur slippers. I snapped. I did not place him here, he was already here and I noticed that peek of light coming in. I’m a big fan of black and whites with dramatic light and will talk about that at the end of this post.


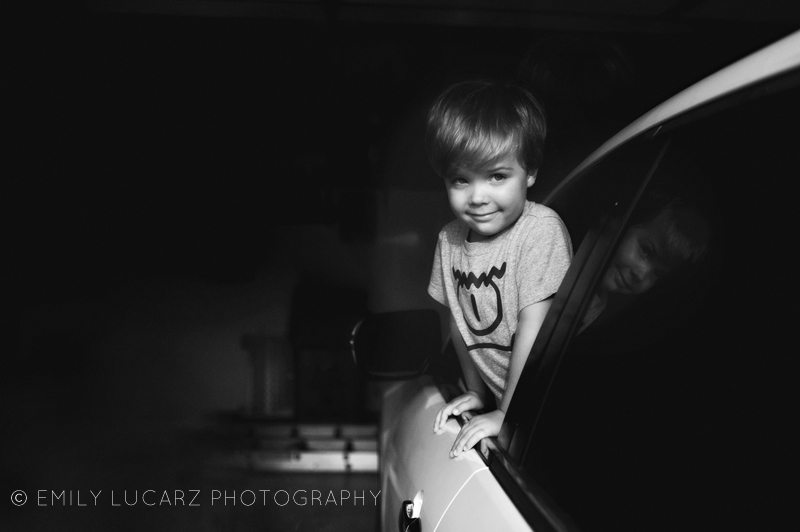
2. Your garage.
For REAL love the garage. Catch a moment like this with your child peeking into the light out of the car. Have one window in your garage? Awesome! Turn off all the lights and find that small streak of light and have your subject go run by it. You will for sure get a cool shot!
3. Your bedroom.
Lots of time you will see peeks of light coming in through your window onto you bed. Here is a photo I took at a maternity shoot. I had her lie on the bed and her face was just illuminated enough to give a beautiful dramatic look.

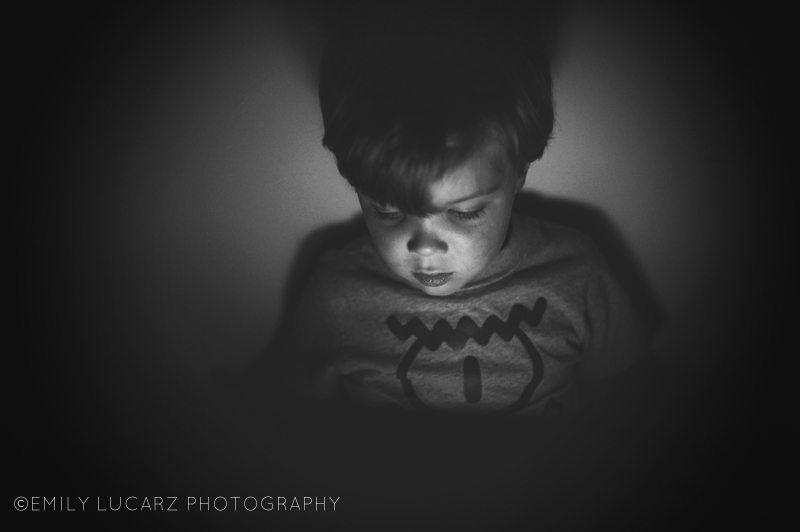
4.In front of brightly lit screens
All of our kids play on the Ipad. Or computers. Take that shot! It’s part of what they do, capture your kiddos at those random times to document ALL of what they do.
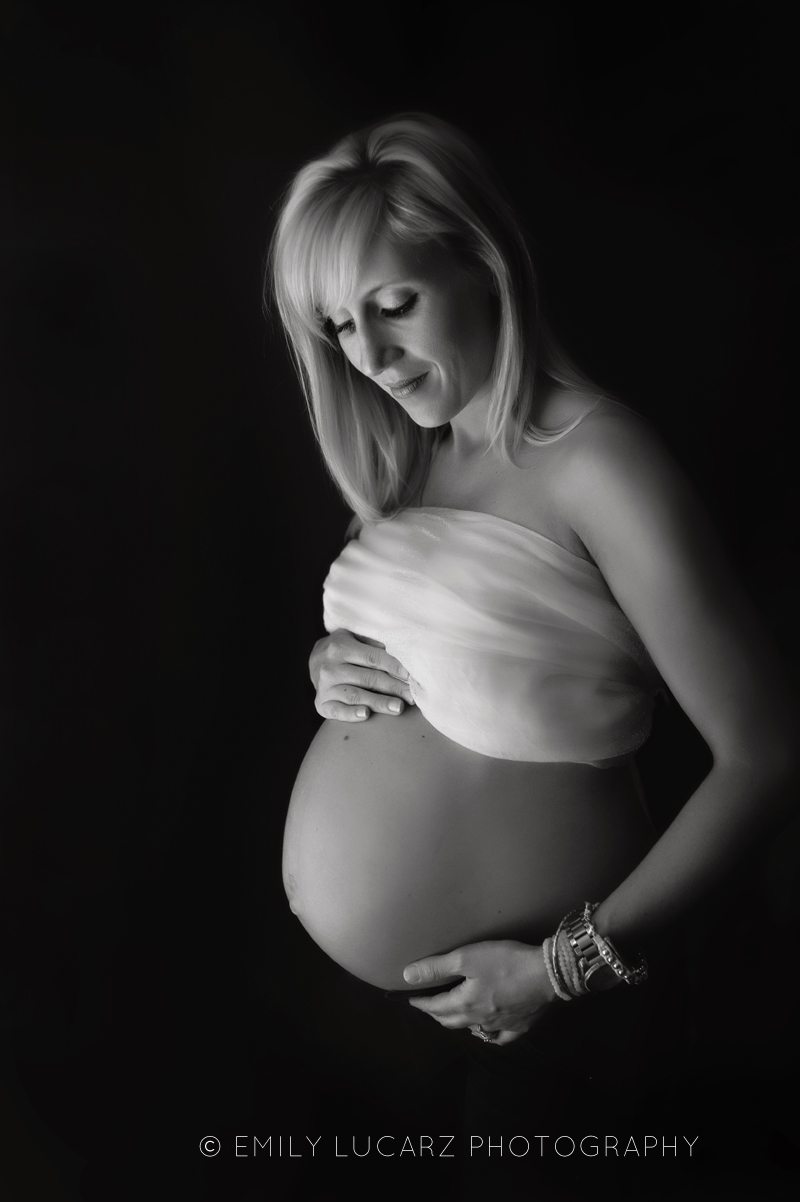
5. In front of a window with all the lights off in the room
This shot was taking of one of my favorite mamas to be. Everyone asks me what kinda of backdrop we used. NONE! I placed her near the window, but far enough away to darken the back of her thus creating deeper shadows and thus increasing the story we were telling ; her belly. We turned off ALL the lights in the room she was in and pull her forward just a touch. No backdrop needed 🙂 Spot metered off her belly to keep that the focus, and this just happened.
Now why do I make these ALL black and white?! Well, I don’t 🙂 But my favorites are! Black and white tell more of a a story for me. I like to keep my black super black, and just focus on whats meant to be exposed for correctly. You can up your blacks in Photoshop or Lightroom to enhance if ya wish! All of the above were edited with my black and white from The Dream in Black and White Action Set.
Emily is a photographer serving the St. Louis area. She is a new member of the celebrity photographers at Chic Critique, a fabulous spot to get real, honest critiquing from a few who have been around a bit. She is a CM Pro as well as a member of the NAPCP. She loves helping photographers grow. 🙂
Would you like to share your thoughts?
Your email address will not be published. Required fields are marked *