Exposure. The most critical piece of a photograph. What is exposure you may ask? Well I will tell you, and please note that this will be the MOST technical thing in this blog post. 🙂 Exposure is how you and your camera use the ISO, Aperture, and Shutter Speed, to determine how light or dark all the dimensions of a photograph will be. PHEW! The hard part is over. Well…sort of.
Exposure is NOT easy to master. When you do, call me so I can send you a virtual hug. If there is ANYTHING I wish I could help everyone with, it would be this. I have written tutorials on this and that, but without good exposure, you can’t even read those. I probably should of started with this one…but that’s my brain for you. Creative…not organized 🙂
Let me start by making my standard disclaimer. I’m self taught. I am just like most people reading this post. I am SO not technical…I’m SO horrible at math and algorithms. I’m just creative. I don’t like having to think, “ok..my aperture is _ so I have to multiply by _ and get a shutter speed of _ etc, etc.). Blah blah blah. So not fun, and SO not Emily.
Exposure does not always mean the bright sections of a photo and the shadows look perfect. It’s not always about that. You can be creative with your exposure to get fun results. But for the sake of trying to help you, the beginner, and not hurt your brain, I will only talk about one type of exposure situation today (natural light typical portrait shooting). This is a beginners tutorial and I will try my hardest to keep it easy to understand. Promise.
Real life. What happens in real life? I know! It’s always a beautiful day, partly cloudy, 75 degrees. Our home are always perfectly lit with beautiful sun coming in. We never have to turn on any lights. Right? Um…yeah no.
That would be wonderful. I do many photo-shoots indoors in families homes that don’t get great light. However, I’ve NEVER used flash. I’ve actually never even used any lighting AT ALL. I recently purchased a soft box. It’s still in the box. I have it for EXTREME cases where I just don’t have enough light. Well, luckily I have not had to put that thing together yet at a session (my son growled at it when I put it together in my family room for fun one time. He thought it was a monster. It was hilarious). Ok back to business.
I completed a photo shoot of a beautiful 6 month old girl yesterday. Her mother told me something, that was the biggest complement, and she didn’t even know it. She told me, “you know, my photographer that we used for our sons photos looked at your site, and could not believe you have never used studio lighting.” Apparently he was blown away by that. He had actually rented equipment to do the same type of shoot I would be doing that day, in the same place. I wonder if he really even believed I really have no idea how to use lighting? :). Well…now after our shoot in their home, she can report back, “yep, Emily really only uses natural light…and without a reflector, although I do have one). I have to say, I have an AMAZING camera. The Nikon D700. My ISO (the sensor in my camera that tells it how sensitive to light it has to be) can go very very high. Having an amazing camera helps a ton. It’s not totally necessary though…but for professional quality it’s a must. It allows me to be in low light situations and not have to use a flash or any studio lights. However, I am in total agreement that sometimes you just have to have studio lights or flash…I just don’t use them. I put myself in a situations where I don’t need all that.
Let me show you an example of what a beautifully exposed photo looks like using all natural light. I will teach you what I did for each photo, so you will have a visual. Let’s start with this one..

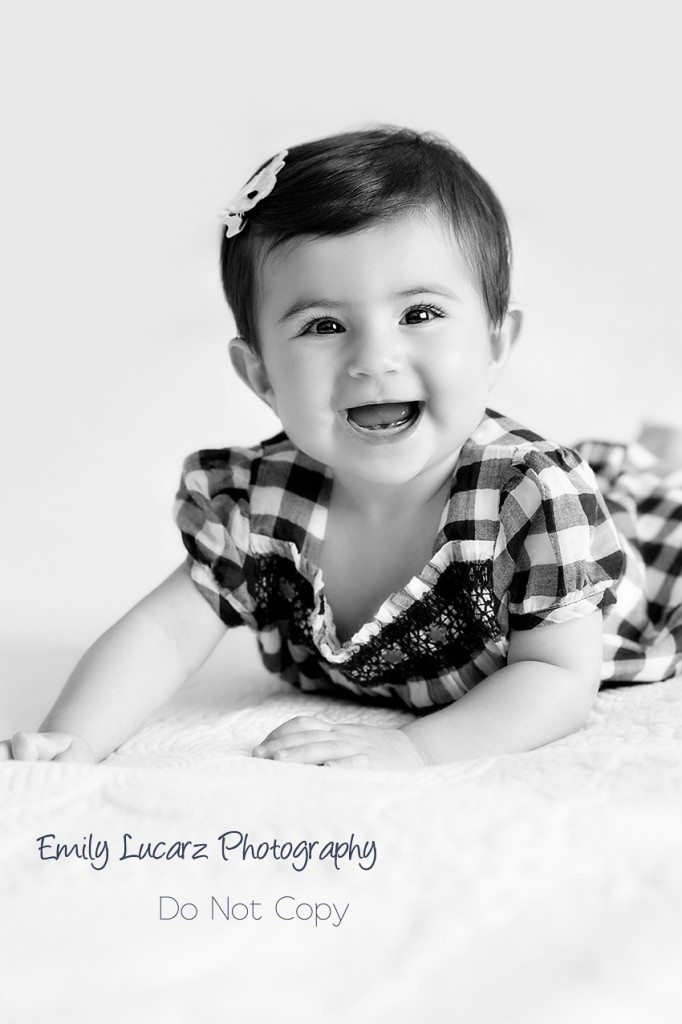
Ok so this will be the most “basic” example. This darling little one was on some white paper. She was about 10 feet in front of a window which faced West. It was 10 am and it was STORMING outside. No joke. But that was ok. Cloudy days make for perfect lighting. So lets walk through this. I will list my settings and then talk about why I used them and how I knew to. Exposure 101 here we go…
Lens: 50mm 1.4
ISO: 1600
Aperture: 3.5
Shutter Speed: 1/200s.
Ok, beginning photographers, don’t freak out. I know most cameras ISO does not go that high without grain. You don’t have to have it this high. I will explain why I PERSONALLY chose to.
For moms with cameras, lets talk about what each of these things are, in VERY simple terms.
(ISO) Your camera has a sensor in it which tells it how sensitive it needs to be to light. Most basic cameras can go up to 400 without getting fuzzy. Mine goes above 4000, which is why I have it. But you don’t have to have that if you are not going pro, just some good light. Generally speaking, you want to keep your ISO as low as possible to help keep your photos less grainy. Lots of light use a low ISO, less light use a higher ISO. The higher it is, the more sensitive it is. Thats a very basic blurb about ISO
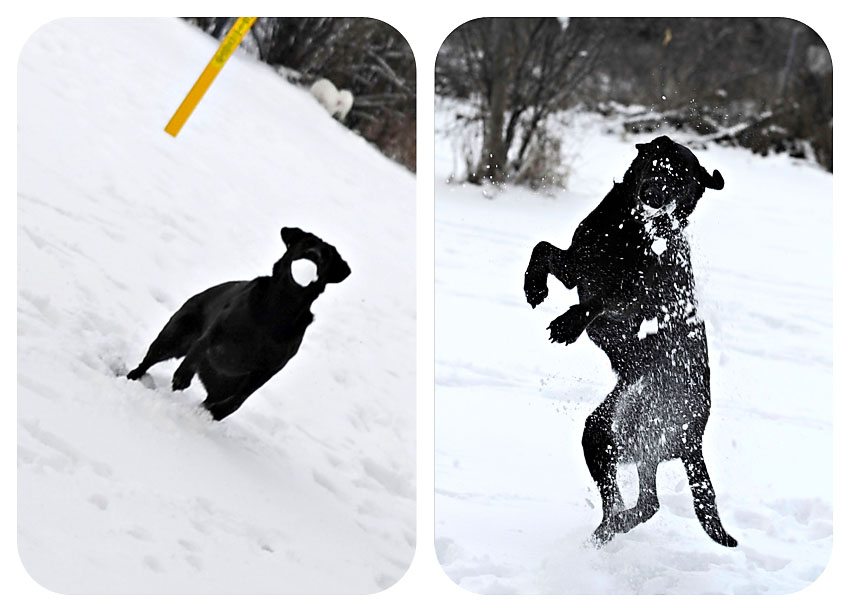
(Shutter Speed) A camera’s shutter determines when the camera sensor will be open or closed to incoming light from the camera lens. The shutter speed specifically refers to how long this light is permitted to enter the camera. So a good example, we all know that for sports or running children, we need a super fast shutter speed to capture every detail. I took these photographs using a VERY high shutter speed. You can see the ball of snow in my dogs mouth before and after she broke it because it caught every second. I went click click click click to capture this. Super fun shots.

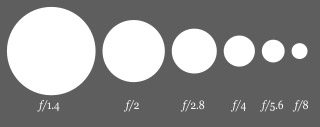
(Aperture) This setting controls how much light can pass through your cameras lens. It is talked about in terms of F-Stop. If you are around me long enough, you will hear me say, lets open up the lens, or Ill say lets stop it down. Same thing. I actually say this in my sleep at this point :). When you open you lens wide, your number gets smaller. I think they did this to hurt our brains. Here is a pic to help you out:

When I shoot a photograph, I first look around at the light. Is it sunny, cloudy, etc. For this photo it was very cloudy (total rainstorm). I knew that there was light coming in the room. We were facing west so it was not directly coming in. A lot of people would of become nervous in that situation and pull out their flash. Don’t. You don’t need it.
To start, what do I want this photograph to look like? Well, I wanted both eyes in focus, her hat in focus, and her body a tad blurry (have good bokeh) So I set my aperture to 4.0. Next up, shutter speed. One thing I know about myself, is that I need a cup of coffee in the morning to function. Therefore, I can get some camera shake sometimes. Blurry photos are no good. So I know, that I PERSONALLY always need my shutter speed to be above 150 to ensure I keep that baby in focus. Most people only need to to be around 100..some even less. If you have a tripod (not realistic with children in my opinion) then you can go super low as long as the child stays still like a statue…hmm. So my shutter speed was at 150. I decided to be safe (I didn’t have much room to move, so I bumped it up to 200. Well then I needed a smaller aperture, so I went to 3.5 (larger hole, smaller number). I needed to change it, remember, because my faster shutter speed let in less light, so I needed my aperture to be lower in number (a larger hole), to allow in more light to make up for it.
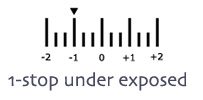
We were 10 feet from the windown on a large backdrop of white paper. She was facing me (West). I use what is called matrix metering. So I took my reading off of her skin. This means, I held down my shutter release and took a “reading off her skin” Here is what that looks like:

So I knew my settings were perfect. If it would of been underexposed, it may of looked like this:

If my photo would of been underexposed, it would of looked too dark, or grey. In that case I know I need more light. So what would I do? Open up my lens (lower my F-Stop), or decrease my shutter speed. OR…..I could up my ISO! Say aperture was already at 1.4. I can’t go any lower. Say my shutter speed was at 150. I dont’t LIKE to go lower. So Im left with my ISO. If I increase my ISO, my camera is more sensitive. It says, oh hello light, I found you! So I would up my ISO to a level that my camera would make this meter shown above to have that little arrow right in the middle. +Note: Not all cameras can do this. If yours can’t increase too high, you just need to move closer to the window or use your flash. But if you use your flash, PLEASE use an external flash and point it to the ceiling to diffuse the light. Heres why:
In this photo it was cloudy outside. The light was 100% diffused for us. We have no harsh shadows. No bright hot spots on her face. When you go outside, try to figure out where the sun is at. You can’t. Im a professional photographer who lives for light. I even can’t. So I carry a compass to know where it’s coming from so I don’t blow out the sky…thats another entire fun fact about me :). Ok so cloudy=diffused light. So please always use diffused light. This one tip, if you don’t take anything from this post is THE MOST IMPORTANT THING YOU WILL EVER KNOW IN YOUR LIFE. Kidding of course…unless you are a photographer :).
So, you ask, then what if it’s SUPER bright out? What then? Well guess what, I’ll tell you! If you are outside, FIND SHADE. The sun is our friend but in moderation. Sun makes us squint, makes for some crazy shadows, makes our white balance unpredictable, it’s just overall no good. However, in the shade, you can open up your lens, keep your ISO really low…go as high as you want on your shutter speed because it won’t matter for portraits. You will also get beautiful natural shadows, not forced ones from crazy sunlight.
Another option outside is to wait for a cloud to roll on by…sometimes that will work, but sometimes you will miss the shot. I have been know to bring a sheet to photo shoots and clip it up on a tree to diffuse light. This works well for sitting children, not so much moving ones :).
Now what if it’s really bright out and you are INSIDE. Well, thats when sheer curtains come in handy, or, if you don’t have any there, get a shower curtain. Yes you read that correctly. I carry around a FROSTED shower curtain liner along with clothes pins. I use it at 50% of my indoor shoots when it’s too bright. Best $10 ever spent.
Friends, I can’t explain how important diffused light is to help master a beautiful, perfectly exposed photo. If you have harsh shadows, your camera meter will be on more cups of Starbucks than I am.
Lets look at an example of when we had very harsh sun. I will give you my settings but not go into details. Let’s use a black and white photo. I say this because if your exposure is off, and you don’t take the photo in camera monochrome, but convert in Photoshop like I do, then your black and white will be overall grey. This is why some photos don’t look that great when you convert to black and white…your exposure was probably off to begin with 🙂

Let me say that you don’t always have to have perfect exposure. For children’s portraits, if you want clean and clear, yes. If you want darker shadows, more moody, etc., you can be creative. But this is for beginners so I don’t want to get to crazy :). This is more for a clean clear photograph, with pretty soft lighting.
Lens: 50mm 1.4
Iso: 1600
Aperture: 3.5
Shutter Speed: 250
Similar as the last photo! I just noticed that haha! At least I’m consistent 🙂 Goes to show you if you control your light (clouds or sheer curtains as we have here), your settings will be the same!
Let me say that you don’t always have to have perfect exposure. For children’s portraits, if you want clean and clear, yes. If you want darker shadows, more moody, etc., you can be creative. But this is for beginners so I don’t want to get to crazy :). This is more for a clean clear photograph, with pretty soft lighting.
Lets recap:
For great exposure you need:
1. A basic knowledge about how your manual mode on your camera works (or Aperture mode)
2. Know your light.
3. Diffuse your light.
4. Meter off the skin (for easy cases with no back lighting)
5. Shoot in RAW (just incase you need to up your exposure…back up only)
6. Shoot wide open if you can (Low aperture number). This will allow for beautiful bokeh when using natural light. (time to invest in a prime lens!)
7. Its best to use a 50mm and above when shooting. Better Bokeh can happen and people just look better. (random fun fact)
8. Hug a window. There is nothing better than soft light coming in through a window. Plus you can get some beautiful natural side lighting to make for natural shadows. LOVE LOVE LOVE snuggling windows!
Phew! That was a long tutorial! I hope I gave you a tip you can put in your back pocket. Please join me on Facebook to be updated on current promotions, tips of the day and just general fun stuff. I’d love to have you over there. We are kind of a like a big family! Feel free to ask me questions about this here or on Facebook. I love open discussions and helping you learn!
Happy Clicking!!!


Would you like to share your thoughts?
Your email address will not be published. Required fields are marked *